Most parameters used in animations or physical models are changed by buttons called “spin buttons”. Excel is a spreadsheet but behind the table there is a engine used to automate certain spreadsheet functions.
This engine can be programmed in a language with a very easy syntax called Visual Basic for Applications, in short VBA. VBA is a very convenient feature in Excel and it can be used almost without any background.
VBA must be used sparingly since it’s a slower animal. Large calculations are better to be performed in the spreadsheet itself. VBA should be used as a “bond” between various functions of the spreadsheet or a “clock” (similar to a processor clock) to animate calculations.
This tutorial will introduce the reader to the use of the spin button and its associated VBA code.
![]()

[sociallocker]![]() [/sociallocker]
[/sociallocker]
Static Macros
by George Lungu
I started using Excel around 1993 while in graduate school.
RIT – my old school in Rochester NY
All Windows stuff seemed awkward not to say annoying at the beginning. That means navigating through directories, opening files, saving and renaming and overall I wasn’t too impressed with anything Excel or the Office suite had to offer except for the fact that I didn’t have to waste paper like with a type writer.
An old Windows logo.
Later I employed Excel for processing data in my thesis work but now I realize I was using it in a very inefficient fashion. You can see all these books and sites around promising increased productivity…, well I was not too productive but I got the work done anyway.
<excelunusual.com>
One of the first important things I learned is that Excel will normally copy formulas in relative reference with neighboring cells.
You can make a reference absolute with respect to a column, a row or both a column and a row by using the dollar sign ($).
You can find out more by opening the “Help” menu in Excel and typing “absolute referencing”
If you still need more clarification you can search Google or YouTube.
<excelunusual.com> 3
A bit of history:
In 2003-2004 I was looking for trends in the stock market using Excel. I needed to do parametric analysis which meant calculating a certain trading strategy work sheet for a family of constants and storing/plotting the results as an array.
It was then when I was introduced to visual basic. I was shown how to create a button in Excel and associate it with a simple Visual Basic code called a macro.
And there was light!
<excelunusual.com> 4
Enabling macros in Excel:
In Excel 2003 or older:
Tools => Macro => Security => Low (or Medium) => OK => Save => Close => Reopen Workbook
In Excel 2007:
Right Click the Office Button => Excel Options => Trust Center => Trust Center Settings => Macro Settings => Disable all macros with notification => OK => Save and Close => Reopen Workbook
When you reopen a file with macros if you get a “Security Warning” do the following:
Options => Enable this content => OK
In Excel 2010 – being done in two stages:
A) Open File => File => Options => Trust Center => Trust Center Settings => Macro Settings => Enable all macros … => OK => OK => Save
B) File => Options => Trust Center => Trust Center Settings => Protected View => Disable them … => OK => OK => Save => Close => Reopen Workbook
<excelunusual.com> 5
Where to find and create macros:
In Excel 2003 and earlier go to Tools => Macro => Visual Basic Editor or simply type “Alt F11”
Workbook And Sheet Modulesare special modules tied directly to the Workbook object and to each Sheet object.
Standard Code Modules, also called Modules, are where you put most of your VBA code.Your basic macros and your custom function (User Defined Functions) should be in these modules.
For the novice programmer, all your code should be in standard modules. For example a function will work only while written in a module. The modules have a much larger scope and they could even be shared between workbooks.
<excelunusual.com> 6
A Spin Button Macro in Visual Basic for Applications (VBA):
This macro will be controlled by a “spin button” and it will adjust the integer value of a certain cell between the lower limit of 1 and the higher limit of 10.
Instructions:
– Open a new workbook
– View -> Toolbox -> Control Toolbox -> Design Mode (click)
– In the control toolbox click “Spin Button” and trace out (drag) a button somewhere around cell “C3”
– Right click the button and select “Properties”
– In the property box replace the name “SpinButton1” with “CountB4” (or some other name you like)
– In the property box replace “min” with 1 and “max” with 10
<excelunusual.com> 7
A Spin Button Macro (continuation)
Spin button
Design mode icon
Control toolbox
Properties box
<excelunusual.com> 8
A Spin Button Macro (continuation):
– You can change colors and other properties to your taste
– Double click the button. The Visual Basic editor window comes up with the following code:
Private Sub CountB4_Change()
End Sub
– Replace the code with the following:
Private Sub CountB4_Change()
Range(“B4”) = CountB4.Value
End Sub
– Now get back to the “Control Toolbox” and exit the design mode by clicking on the icon with the same name.
– Close the control toolbox window and try to see if the button you just created works as expected
<excelunusual.com> 9
A Spin Button Macro (continuation):
Verification:
– Let’s associate a chart with cell B4
– Select cell “B4” => Insert => Chart => Column => Finish
– Select the chart => Format Y axis => Maximum = 0, Minimum = 12
– Click the spin button and see the effects on the chart
<excelunusual.com> 10
A “Select-Case” Macro in Visual Basic for Applications (VBA)
Sometimes the correspondence between the value of the cell and the value of the macro argument is not a linear one but can be described as a look-up table.
In this case we will use the “Select Case” construct in VBA. The syntax for the Case statement is:
Select Case test_expression
Case condition_1
result_1
……………………
……………………
Case condition_n
result_n
Case Else
result_else
End Select
“test_expression” is a string or numeric value. It is the value that you are comparing to the list of conditions (labeled from 1 to n). Once a condition is found to be true, the Case statement will execute the corresponding code and not evaluate the conditions any further.
<excelunusual.com> 11
The “Select-Case” Macro – continuation
Instructions:
1. In the existing work sheet (Sheet_1) enter the design mode by doing the following:
View -> Toolbox -> Control Toolbox -> Design Mode (click)
2. In the control toolbox click “Spin Button” and trace out (drag) a button somewhere around cell “O3”
3. Right click the button and select “Properties”
4. In the property box replace the name “SpinButton1” with “Select_CaseN4” (or some other name you like)
5. In the property box replace “min” with 1 and “max” with 7
6. You can change colors and other properties to your taste
7. Double click the button. The Visual Basic editor window comes up with the following code:
Private Sub CountB4_Change()
End Sub
<excelunusual.com> 12
The “Select-Case” Macro – continuation
Instructions:
– Replace the macro Select Case Case_SelectN4
Private Sub C_S_N4_Change()
code with the following: Case 1
Range(“N4”) = 0.1
Case 2
Range(“N4”) = 0.2
Case 3
Range(“N4”) = 0.5
Case 4
Range(“N4”) = 1
Case 5
Range(“N4”) = 2
Case 6
Range(“N4”) = 5
Case Else
Range(“N4”) = 10
End Select
End Sub
<excelunusual.com> 13
The “Select-Case” Macro – continuation
Verification:
– Now get back to the “Control Toolbox” and exit the design mode by clicking on the icon with the same name.
– Close the control toolbox window and try to see if the button you just created works as expected.
You are supposed to be able to go through the following combination of values in Cell “N4” in any diraction:
0.1 => 0.2 => 0.5 => 1 => 2 => 5 =>10
0.1 <= 0.2 <= 0.5 <= 1 <= 2 <= 5 <=10
<excelunusual.com> 14
The “Application” Macro in Visual Basic for Applications (VBA):
Often times, the output of a macro must be expressed as a function of the macro’s argument. This function might not exist in VBA and in this case we will use the following construct: Application.Function(), where “Function” is the name of the equivalent spreadsheet function. This way we can use a large variety of functions nonexistent in VBA.
Instructions:
– After creating a spin button, right click it and select “Properties”
– In the property box replace the name “SpinButton1” with “RotateB4” (or some other name you like)
– Double click the button and replace the existing Visual Basic code with:
Private Sub AppR4_Change()
Range(“R4”) = Application.Round(AppR4.Value / 17, 1)
Range(“R5”) = Application.SumIf(Range(“R8:R15”), “>0”)
End Sub
<excelunusual.com> 15
The “Application” Macro (continuation):
This macro uses the spreadsheet function
“Round” to find the truncated value (with one
digit past the decimal point) of the macro
argument divided by 17 and display it in cell
“R4”. (search Help for the function “Round”)
The macro also takes the positive values in
the range “R8:R15” and sums them up,
displaying the result in cell “R5” (search
Help for the function “Sumif”)
<excelunusual.com> 16
The “Rotation” Macro in Visual Basic for Applications (VBA):
This macro will be controlled by a “spin button” and it will adjust the integer value of a certain cell between the lower limit of 0 and the higher limit of 355 in increments of 5 degrees as an infinite loop. This macro uses two “If” statements in order to get the angle to loop around between the values 0 and 355.
Instructions:
– View -> Toolbox -> Control Toolbox -> Design Mode (click)
– In the control toolbox click “Spin Button” and trace out (drag) a button somewhere around cell “W3”
– Replace the name “SpinButton1” with “RotV4”
– In the property box replace “min” with -1 and “max” with 80
– Double click the button and replace the existing Visual Basic code with:
Private Sub RotV4_Change()
If RotV4 > 71 Then RotV4 = 0
If RotV4 < 0 Then RotV4 = 71
Range(“V4”) = 5 * RotV4.Value
End Sub
<excelunusual.com> 17
The “Rotation” macro (continuation):
In order to easily verify the functionality we will have to add a 2×2 table:
Cell “V9”=0
Cell “W9”=0
Cell “V10”= cos(radians(V4))
Cell “W10”= sin(radians(V4))
We’ll add an XY scatter plot too:
The “X values” will be from the range “V9:V10”
The “Y values” will be from the range “W9:W10”
The axes will have a range between -1.2 to 1.2
Clicking the spin button will rotate the charted segment in both directions.
<excelunusual.com> 18
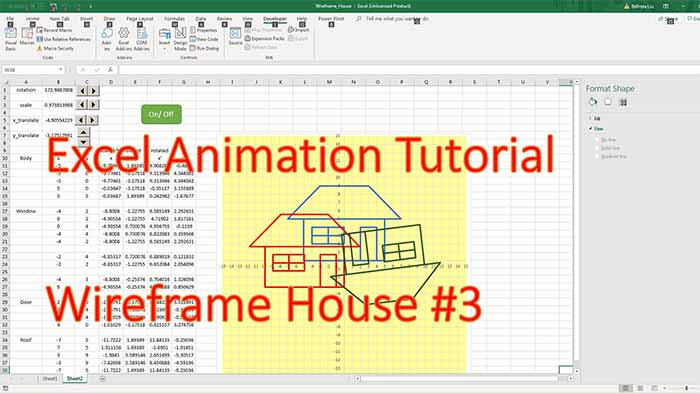
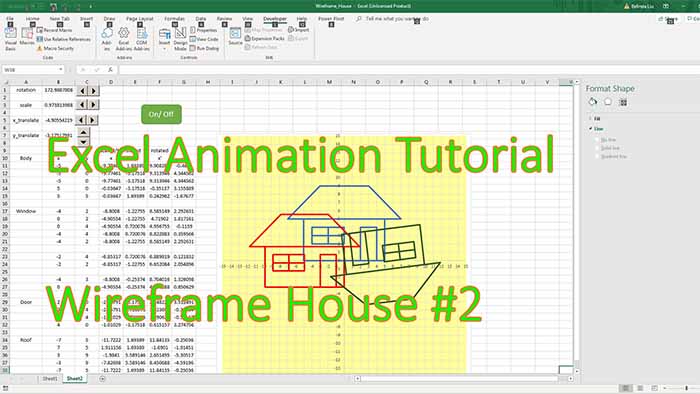
Conclusions:
Five different shape alterations were shown in this presentation:
1. Resizing – which can be done independently on each axis by multiplying the coordinates by a certain factor while the shape is centered in the origin.
2. Translation – which can be done independently on each axis by adding or subtracting a term to each coordinate.
3. Simple rotation – formulas were derived for rotation around the origin by an angle a of a shape centered in origin.
4. Rotation of a shape around its own axis – the exact derivation was not given but the recipe is to translate the shape back to origin, then rotate it and then translate the shape to it’s final position (translation + rotation + translation)
5. Scene rotation – this is just a simple rotation but the shapes in the scene are held fixed at their own coordinates.
A MS Excel 2003 work book with all the examples can be downloaded.
The reader is advised to examine the functionality of each section of the work sheet and try to rebuild it from scratch reading as little as possible.
This presentation should be seen as a lure or a lifeline.
The farther you can reach with the least reading, the more knowledge you’ll gain.
Your only real teacher lives in yourself. Spend few days, don’t rush!
by George Lungu <excelunusual.com>
George,
This was wonderful start for me . I will keep going on
Thanks
Thanks, HS.
Hi, George.
I want to thank you again for this Excell teaching.
You really open my our eyes with the engineering applications we can
do in Excell.
Will you post the Wireframe in 3D (xyz) any soon?. I learn more when I download and read your PDF teaching.
Thank you again
You are welcome, Francisco. Don’t forget for each hour you read my stuff put 10 or 100 hours of your work. Otherwise it’s just like school, namely you won’t learn much. Try, with this stuff to do something original. Do not rush. George
PS give me 3 weeks for the 3D, I have some other priorities.
Sure, no problem just give me credit for it.
Hi. man, I just browsing by means of the www searching for some info on this and came across your blog. I am very glad by the info that you just have here. It shows how well you comprehend this. Bookmarked this page for further reading, will come back for more. But, wait… I feel your blog a little slower, you can use w3 total cache if you use wordpress to speed up your blog. Just a tip… ..