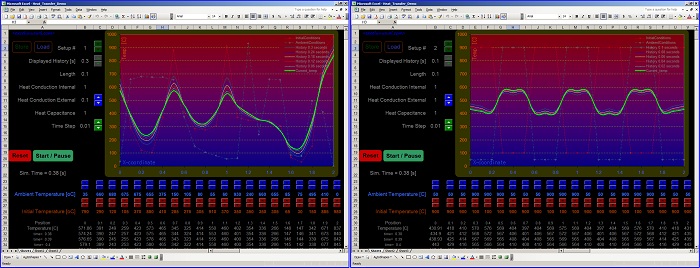
Hi guys, Here is a 1D dynamic model I built today simulating heat transfer in a 21-segment bar. Just click on the orange “Demo” button for a quick demo.
Hitting “Reset” sets the 21 segments of the bar to the initial conditions which is a fully customizable initial temperature map.
Clicking “Start/Pause” starts the simulation and you can watch the bar temperature profile slowly settling to equilibrium. I recommend you leave the simulation running while adjusting any other button.
You can reset it while it’s running. In the upper left side there is a spin button called “Setup#”. This selects a location between 1 and 100 where you could save your setup by hitting the button “Store” nearby.
To retrieve a setup go the he desired setup# and hit “Load”. Right now only locations 1, 2, 3, 4, 5, 6, 7, 8, 9 and 10 are full, you can use the rest to store your own setups.
Heat conduction within the bar is modeled as well as heat conduction between the bar and an external custom fluid. The temperature map of the ambient fluid can be customized too.
Though very nice, this model uses just a hypothetical material with adjustable properties. No real material is considered. If you need real materials you need to handle constants on your own.
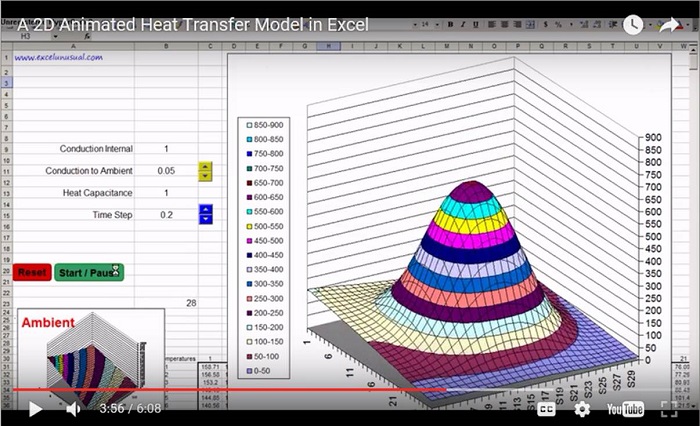
The user however can adjust the heat capacitance of the elements and the heat conductance between the bar elements themselves and between the bar elements and the ambient fluid. This is a standard diffusion model. It is simulated as an RC electrical network since the principle is identical. The making of this model can be easily explained. 2D models will follow, as well as several tutorials.
Download and enjoy, George.
![]()
[sociallocker]![]() [/sociallocker]
[/sociallocker]

Amit, just go and type “heat transfer” (no quotation marks) in the search box in the upper left area of the page and find the tutorials by a series of links.
kindly make also land civil profiler if you can do it
very amazing job! I can’t imagine excel can do all of these suff. I used to develop programs in matlab. Now I work in a company and learn excel everyday.
Thanks Clark. The model is perhaps slower to build and it might not be of a very large size, but it is very fast and interactive. Besides, the experience of building it in Excel without any “crutches” and “training wheels” is priceless.
Hello;
Any idea how can I model a rock crib which has an inflow in excel?
Thank you
Sure, Chang. Make sure to always keep the link, I really need visitors. How about I give you the templates in .ppt and we post your Chinese upgrades on my site, then everybody can get them and I get more visitors. The advantage would be that I can answer questions and take suggestions for future posts. I am full time on this.
In fact, people in China cannot connect to most websites aboard… so I have to share stuff with my friends one by one…
But don’t worry, Chinese students studying in America don’t need me to translate, they can read by themselves. So, I will introduce your website link to our community or scholar association. Your blog becoming popular is also my wish, so I can do what I do to introduce your blog.
I am in Colorado Springs.
I just updated the model for 100 setup locations. Again, the first 10 are mine and the rest are free. You don’t have to use the spin buttons to define profiles for your own setups since the buttons are slow. If you need decreasing ramp for instance type a 700 in B28, then type “=B28-50” in C28 and copy to the right up to V28. Run the model, change other params and if you like it dial a new setup# and hit “Store”.
GeorgiaTech?
Yes, I am in Gatech. I noticed your time is different from mine… You get up so early. Hope I didn’t interrupt your morning time. : )
George, maybe in the future am I allowed to translate some material in your blog into Chinese, and share with my friends in China?
I am in Georgia
Amazing…
George, you spend only a week to go into another field. What a strong studying ability.( This sentence may be weird… sorry for my English) 🙂
I am learning from you.
Chang, I did it yesterday. I had to finish the PLL first. After I talked to you I checked Wikipedia for few minutes. It looked so complicated with all the nablas and stuff (and I am completely rusty with that) that I decided to do it myself. It took me a day but the physics was functional in an hour. It is 100% a R-C-R-C-R-…-R-C-R with the caps at ground. Most of the effort was in the interface. Had I had to understand the standard heat transfer theory I would have gotten crazy. Lots of noise for nothing. The ambient is modeled as some additional resistors to differnt voltages (ambient temperatures). Check out the latest model (I JUST updated). Start the model than increment the “Setup#” and hit “Load”, watch it for few seconds then increment the “Setup#” again and hit “Load” and so on unitl you run through my first 10 setups. Again keep the model running while you do this. It looks cooler. Make your own setups, change everything. You can save your own up to Setup# 100. Also change the conductance to ambiend while the model is running. Also play with the Displayed history length.
The next day or two I’ll make tutorials about this model. and then I will do a 2D (that’s as easy as this). Then I’ll make a couple of tutorials about that and do the 3D + tutorials.
all the data are changing without formula (except current temperature collection) in cells. I will see how do you do that in tutorials.
Being excited to wait for 2D and 3D.
Chang, where are you located?