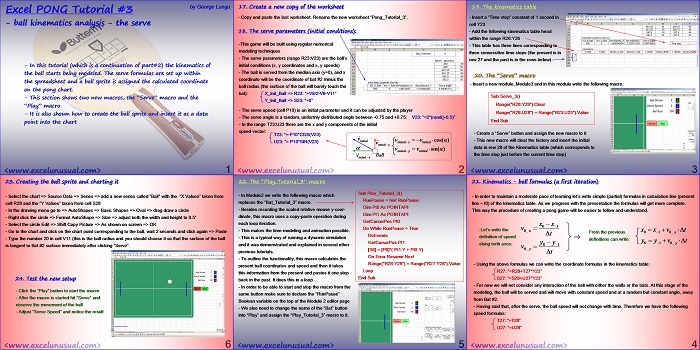
In this tutorial (which is a continuation of part#2) the kinematics of the ball starts being implemented.
Two new macros are being introduced, the “Serve” macro and the “Play” macro.
![]()
Excel PONG Tutorial #3 – ball kinematics analysis – the serve
by George Lungu
– In this tutorial (which is a continuation of part#2) the kinematics of
the ball starts being modeled. The serve formulas are set up within
the spreadsheet and a ball sprite is assigned the calculated coordinate
on the pong chart.
– This section shows two new macros, the “Serve” macro and the
“Play” macro
– It is also shown how to create the ball sprite and insert it as a data
point into the chart
<excelunusual.com> 1
17. Create a new copy of the worksheet
– Copy and paste the last worksheet. Rename the new worksheet “Pong_Tutorial_3”.
18. The serve parameters (initial conditions):
-This game will be built using regular numerical
modeling techniques
– The serve parameters (range R23:V23) are the ball’s
initial conditions (x, y coordinates and x, y speeds)
– The ball is served from the median axis (y=0), and x
coordinate will be the coordinate of bat #2 minus the
ball radius (the surface of the ball will barely touch the
bat):
X_Init_Ball => R23: “=V9/2-V8-V11”
Y_Init_Ball => S23: “=0”
– The serve speed (cell P10) is an initial parameter and it can be adjusted by the player
– The serve angle is a random, uniformly distributed angle between -0.75 and +0.75: V23: “=2*(rand()-0.5)”
– In the range T23:U23 there are the x and y components of the initial
speed vector:
T23: “=-P10*COS(V23)
U23: “= P10*SIN(V23)
<excelunusual.com> 2
19. The kinematics table
– Insert a “Time step” constant of 1 second in cell Y23
– Add the following kinematics table head within the range R26:Y26
– This table has three lines corresponding to three consecutive time steps (the present is in row 27 and the past is in the rows below)
20. The “Serve” macro
– Insert a new module, Module3 and in this module write the following macro:
Sub Serve_3()
Range(“R28:Y28”).Clear
Range(“R28:U28”) = Range(“R23:U23”).Value
End Sub
– Create a “Serve” button and assign the new macro to it
– This new macro will clear the history and insert the initial
data in row 28 of the Kinematics table (which corresponds to
the time step just before the current time step)
<excelunusual.com> 3
21. Kinematics – ball formulas (a first iteration)
– In order to maintain a moderate pace of learning let’s write simple (partial) formulas in calculation line (present
line – t0) of the kinematics table. As we progress with the presentation the formulas will get more complete.
This way the procedure of creating a pong game will be easier to follow and understand.
-Let’s write the definition of speed along both axes using a forward estimate:
From the previous definitions can write:
– Using the above formulas we can write the coordinate formulas in the kinematics table:
R27: “=R28+T28*Y23”
S27: “=S28+U28*Y23”
– For now we will not consider any interaction of the ball with either the walls or the bats. At this stage of the
modeling, the ball will be served and will move with constant speed and at a random but constant angle, away
from Bat #2.
– Having said that, after the serve, the ball speed will not change with time. Therefore we have the following
speed formulas:
T27: “=T28”
U27: “=U28”
<excelunusual.com> 4
22. The “Play_Tutorial_3” macro
-In Module2 we write the following macro which replaces the “Bat_Tutorial_3” macro.
-Besides recording the scaled relative mouse y-coor-dinate, this macro uses a copy-paste operation during each loop iteration.
-This makes the time modeling and animation possible.
-This is a typical way of running a dynamic simulation and it was demonstrated and explained in several other previous tutorials.
-To outline the functionality, this macro calculates the present ball coordinates and speed and then it takes this information from the present and pastes it one step back in the past. It does this in a loop.
-In order to be able to start and stop the macro from the same button make sure to declare the “RunPause” Boolean variable on the top of the Module 2 editor page
-We also need to change the name of the “Bat” button into “Play” and assign the “Play_Tutorial_3” macro to it.
Sub Play_Tutorial_3()
RunPause = Not RunPause
Dim Pt0 As POINTAPI
Dim Pt1 As POINTAPI
GetCursorPos Pt0
Do While RunPause = True
DoEvents
GetCursorPos Pt1
[S6] = [P8]*(-Pt1.Y + Pt0.Y)
On Error Resume Next
Range(“R28:Y29”) = Range(“R27:Y28”).Value
Loop
End Sub
<excelunusual.com> 5
23. Creating the ball sprite and charting it
– Select the chart => Source Data => Series => add a new series called “Ball” with the “X Values” taken from cell R28 and the “Y Values” taken from cell S28
– In the drawing menu go to => AutoShapes => Basic Shapes => Oval => drag draw a circle
– Right click the circle => Format AutoShape => Size => adjust both the width and height to 0.5”
– Select the circle Edit => Shift Copy Picture => As shown on screen => OK
– Go to the chart and click on the chart point corresponding to the ball, wait 2 seconds and click again => Paste
– Type the number 20 in cell V11 (this is the ball radius and you should choose it so that the surface of the ball is tangent to Bat #2 surface immediately after clicking “Serve”.
24. Test the new setup
– Click the “Play” button to start the macro
– After the macro is started hit “Serve” and
observe the movement of the ball
– Adjust “Serve Speed” and notice the result
by George Lungu <excelunusual.com>


Surabhi,Open the VBA editor and chech out the macros in the modules. There must be one which takes the coordinates of the cursor on the screen and paste it (scaled) in cell S6. I found it:
Sub Bat_Tutorial_2()
[A42] = [BG1].Value
Dim Pt0 As POINTAPI
Dim Pt1 As POINTAPI
RunPause = Not RunPause
GetCursorPos Pt0
Do While RunPause = True
DoEvents
GetCursorPos Pt1
[S6] = [P8] * (-Pt1.Y + Pt0.Y)
Loop
End Sub
How is the bat2 moving when “Bat” macros is enabled. I am unable to do it. Please help.