This is the first part of a tutorial (self, 2, 3) about modeling logic gates in MS Excel 2003. This first model will include no delay or loading for the gates.
The following type of gates will be described: inverter, AND, NAND, OR, NOR, XOR (exclusive or) and XNOR.
The tutorial will have several parts and the last part will build up to a more complex and accurate model including effects such as: power supply voltage, output impedance and input capacitance (from which low pass fillter effects will be derived within the model).
This is not an introduction to digital electronics. The reader should get somewhat familiar with the topic before attempting to build the models described here.
![]()

![]()
Introduction to Digital Electronics – Ideal Logic Gates – Part#1
by George Lungu
– This tutorial is not meant to be a theoretical introduction to digital electronics, but a
mere introduction to logic gates and their implementation in Excel, first as ideal static
models and later using more realistic animated models which include propagation delay,
loading, strength, power supply voltage, etc.
– This type of electronics is covered in detail in most undergraduate curricula in schools of
as Electrical Engineering, Computer Engineering or Computer Science.
– You could casually refresh your memory about logic gates from Wikipedia:
(https://en.wikipedia.org/wiki/Logic_gate)
and also check out the following friendly site:
(https://www.asic-world.com/digital/tutorial.html)
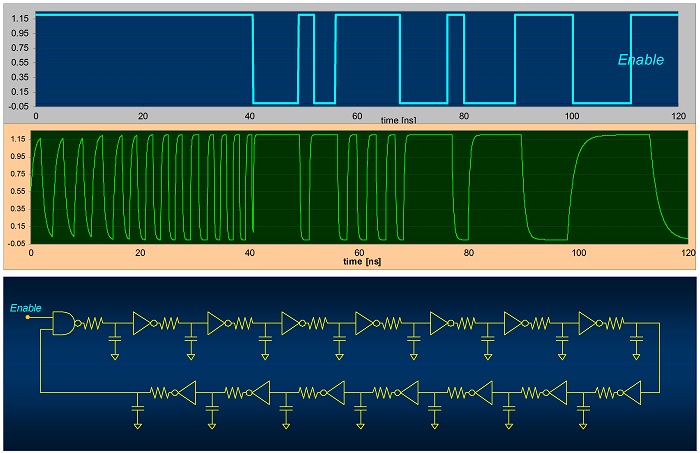
The INVERTER or NOT-gate:
– This gate performs the most basic operation, the logic inversion. You can find the symbol, the
logic equation and the truth table below.
The AND-gate:
– This gate performs the logic multiplication. You can find the
symbol, the logic equation and the truth table below. 0 0 0
– This gate produces the negated output of an AND gate. You can
find the symbol, the logic equation and the truth table below. 0 0 1
– This gate performs the logic addition. You can find the symbol,
the logic equation and the truth table below. 0 0 0
<excelunusual.com>
2
The NOR-gate:
– This gate produces the negated output of an OR gate. You can
find the symbol, the logic equation and the truth table below. 0 0 1
The exclusive OR or XOR-gate:
A B Out
– This gate performs the exclusive OR operation. This operation is the
binary addition. You can find the symbol, the logic equation and the truth
The XNOR-gate:
A B Out
– This gate produces the negated output of a XOR gate. You can find the
symbol, the logic equation and the truth table below. 0 0 1
<excelunusual.com>
3
A static spreadsheet logic gate implementation:
– Open a new file, name it “Logic_Gates_1” and name the first worksheet “Basic_1”
Create the following cell labels:
– In cell A1 type “Time Step [ns]” and as a
starting value type “0.1” in cell A2.
– Type the table head in range [A35:J35] as seen
in the snapshot to the right.
Name cell [A2]:
– Click cell [A2]
– In the corner of the worksheet, replace the cell
name “A2” with “time_step” (see below).
– In case that later you want to remove the cell
name before renaming it you do the following
operations: Select any cell => Insert => Name =>
Define => Delete the name of the cell you need to
remove from the pop up menu
<excelunusual.com>
4
Create a time series in column A:
– Cell A37: “=800*time_step”
– Cell A38: “=A37-time_step”, then copy cell A38 down to cell A837
Create the two input signals “A” and “B” in columns B and C:
– Cell B37: “=0.5*(1+SIGN(SIN((2*PI()*A37/40))))”
– Cell C37: “=0.5*(1+SIGN(SIN((2*PI()*A37/20))))”
– Copy range [B37:C37] down to row 837 (you can easily
achieve that by just highlighting range [B37:C37] and
clicking the lower right corner of that range so the “Auto
Fill” feature of excel would do the job)
Create a stacked array of nine x-axes for the 2 input and 7 output signals:
– In would be nice to plot the two inputs and seven outputs on a single chart and not overlapping but
stacked vertically. To achieve this goal we will chart the first input (A) with no vertical offset, the
second input (B) with a negative vertical offset (-2 let’s say), the first output (INV) with double that
offset (-4), the second output (AND) with three times that offset (-6) and so on.
– Let’s now create the data for the array of stacked x-axes.
– Range M35:M63 as well as range N37:O37 will contain labels (names) as shown in the next page
snapshot. You can use different names if you like. =>>>
<excelunusual.com>
5
– Cell N39: “=$A$37”
– Cell N40: “=$A$837”
– Cell O39: “=0”
– Cell O40: “=O39”
– Copy range N39:O40 into range N42:O43 and
change cell O42 into O42: “=-offset”
– Copy range N42:O43 into range N45:O46 and
change cell O45 into O45: “=-2*offset”
– Copy range N45:O46 into range N48:O49 and
change cell O48 into O48: “=-3*offset”
– Copy range N48:O49 into range N51:O52 and
change cell O51 into O51: “=-4*offset”
– Copy range N51:O52 into range N54:O55 and
change cell O54 into O54: “=-5*offset”
– Copy range N54:O55 into range N57:O58 and
change cell O57 into O57: “=-6*offset”
– Copy range N57:O58 into range N60:O61 and
change cell O60 into O60: “=-7*offset” 0
– Copy range N60:O61 into range N63:O64 and
change cell O63 into O63: “=-8*offset” -6
Plot the stacked axes:
– You can plot the stacked axes on a provisional scatter chart -14
to check for errors. We can see that the axes look fine as
charted (for offset = 2) and they are evenly spaced.
to be continued…
<excelunusual.com>
6
Very usefull
Nice Work