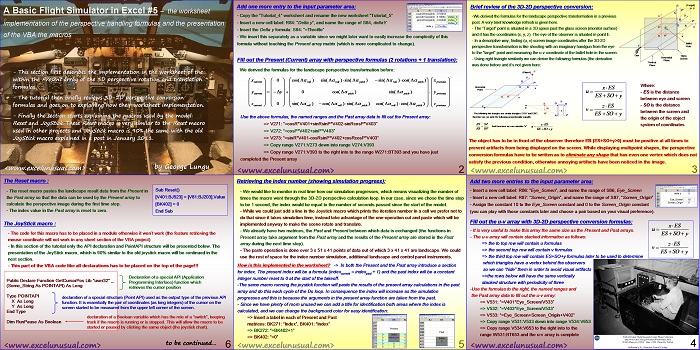
This section explains the spreadsheet implementation of the perspective rotation and translation formulas within the Present array.
It also shows the implementation of the 3D-2D conversion formulas within the Past array, then it goes on to presenting the VBA macros used (the Reset and JoyStick macros).
A Basic Flight Simulator in Excel #5 – the worksheet implementation of the perspective handling formulas and the presentation of the VBA the macros
by George Lungu
– This section first describes the implementation within the Present array
of the 3D perspective rotation and translation formulas.
– The tutorial then briefly reviews 3D-2D perspective conversion formulas
and goes on to explaining their worksheet implementation.
– Finally the section starts explaining the macros used by the model: Reset
and JoyStick. These Reset macro is very similar to the Reset macro used in
other projects and JoyStick macro is 90% the same with the old JoyStick
macro explained in a post in January 2011, the only difference being the
introduction of two more DoEvents statements (to allow for more prompt
charting) and the addition of a paste line (from Present array into the
Past array) in order to emulate the dynamic nature of the model.
<excelunusual.com>
Add one more entry to the input parameter area:
– Copy the “Tutorial_4” worksheet and rename the new worksheet “Tutorial_5”
– Insert a new cell label: R84: “Delta y”, and name the range of S84, deltaY
– Insert the Delta y formula: S84: “=Throttle”
– We insert this separately as a variable since we might later want to easily increase the complexity of this
formula without touching the Present array matrix (which is more complicated to change).
Fill out the Present (Current) array with perspective formulas (2 rotations + 1 translation):
We derived the formulas for the landscape perspective transformation before:
Use the above formulas, the named ranges and the Past array data to fill out the Present array:
=> V271: “=cosR*V401+sinRsinP*V402-sinRcosP*V403”
=> V272: “=cosP*V402+sinP*V403-Throttle”
=> V273: “=sinR*V401-cosRsinP*V402+cosRcosP*V403”
=> Copy range V271:V273 down into range V274:V393
=> Copy range V271:V393 to the right into to the range W271:BT393 and you have just completed the Present array
<excelunusual.com> 2
z (Target)
Brief review of the 3D-2D perspective conversion:
-We derived the formulas for the landscape perspective transformation in a previous post. A very brief knowledge refresh is given here.
– The “Target” point is situated in a 3D space past the glass screen (monitor surface) and it has the coordinates (x, y, z). The eye of the observer is situated in point E.
– In a descriptive way, finding (u, v) screen image coordinates after the 3D-2D
perspective transformation is like shooting with an imaginary handgun from the eye E Hole
to the “target” point and measuring the u-v coordinate of the bullet hole in the screen.
– Using right triangle similarity we can derive the following formulas (the derivation Screen was done before and it’s not given here: Plane
(Object) P
– The following two triangles are similar triangles: EO’A’ and EBP’, A’
therefore we can write the following proportionality equality:
the origin of the object
The object has to be in front of the observer therefore EB (ES+SO+y>0) must be positive at all times to
prevent artifacts from being displayed on the screen. While displaying multipoint shapes, the perspective
conversion formulas have to be written as to eliminate any shape that has even one vertex which does not
satisfy the previous condition, otherwise annoying artifacts have been noticed in the image.
<excelunusual.com> 3
Add two more entries to the input parameter area:
– Insert a new cell label: R86: “Eye_Screen”, and name the range of S86, Eye_Screen
– Insert a new cell label: R87: “Screen_Origin”, and name the range of S87, “Screen_Origin”
– Assign the constant 10 to the Eye_Screen constant and 0 to the Screen_Origin constant
(you can play with those constants later and choose a pair based on your visual preference).
Fill out the u-v array with 3D-2D perspective conversion formulas:
– It is very useful to make this array the same size as the Present and Past arrays.
– The u-v array will contain stacked information as follows:
=> the to top row will contain u formulas
=> the second top row will contain v formulas
=> the third top row will contain a condition later to be used to determine which
triangles have a vertex behind the observers so we can
“hide” or mask them in order to avoid visual artifacts
=>the rows below will have the same vertically
stacked structure with periodicity of three
-Use the formulas to the right, the named ranges and
the Past array data to fill out the u-v array
>V531: “=V401*Eye_Screen/(Eye_Screen+Screen_Origin+V402)”
>V532: “=V403*Eye_Screen/(Eye_Screen+Screen_Origin+V402)”
>V533: “=IF(Eye_Screen+Screen_Origin+V402>0,1,0)”
>Copy range V531:V533 down into range V534:V653
>Copy range V534:V653 to the right into to the
range W531:BT653 and the u-v array is complete
4
<excelunusual.com>
Retrieving the index number (showing simulation progress):
– We would like to monitor in real time how our simulation progresses, which means visualizing the number of
times the macro went through the 3D-2D perspective calculation loop. In our case, since we chose the time step
to be 1 second, the index would be equal to the number of seconds passed since the start of the model.
– While we could just add a line in the Joystick macro which prints the iteration number in a cell we prefer not to
do that since it takes simulation time, instead take advantage of the one-operation cut and paste which will be
implemented anyway to make the scene rotate and translate.
– We already have two matrices, the Past and Present between which data is exchanged (the functions in
Present array take argument from the Past array and the results of the Present array are stored in the Past
array during the next time step).
– The paste operation is done over 3 x 51 x 41 points of data out of which 3 x 41 x 41 are landscape. We could
use the rest of space for the index number simulation, additional landscape and control panel instruments.
How is this implemented in the worksheet? -> In both the Present and the Past array introduce a section
for index. The present index will be a formula (indexcurrent = indexpast + 1) and the past index will be a constant
integer number reset to 0 at the start of the takeoff.
-The same macro running the joystick function will paste the results of the present array calculations in the past
array and do this each cycle of the Do loop. In consequence the index will increase as the simulation
progresses and this is because the arguments in the present array function are taken from the past.
– Since we have plenty of room unused we can add a title for identification both areas where the index is
calculated, and we can change the background color for easy identification:
=> Insert a label in each of Present and Past
matrices: BK271: “Index”, BK401: “Index”
=> BK272: “=BK402+1”
=> BK402: “=0”
<excelunusual.com> 5
The Reset macro :
– The reset macro pastes the landscape result data from the Present in
the Past array so that the data can be used by the Present array to [V401:BJ523] = [V81:BJ203].Value
calculate the perspective image during the first time step. [BK402] = 0
– The index value in the Past array is reset to zero. End Sub
The JoyStick macro :
– The code for this macro has to be placed in a module otherwise it won’t work (the feature retrieving the
mouse coordinate will not work in any sheet section of the VBA project)
– In this section of the tutorial only the API declaration and PointAPI structure will be presented below. The
presentation of the JoyStick macro, which is 90% similar to the old joystick macro will be continued in the
next section.
– This part of the VBA code like all declarations has to be placed on the top of the page!!!
Sub Reset()
Declaration of a special API (Application
Public Declare Function GetCursorPos Lib “user32” _
Programming Interface) function which
(Some_String As POINTAPI) As Long
retrieves the cursor position
Type POINTAPI
declaration of a special structure (Point API) used as the output type of the previous API
X As Long
function. It is essentially the pair of coordinates (as long integers) of the cursor on the
Y As Long
screen started to be measured from the upper left corner of the screen.
End Type
declaration of a Boolean variable which has the role of a “switch”, keeping
Dim RunPause As Boolean track if the macro is running or is stopped.
This will allow the macro to be started or paused by clicking the same object (the joystick chart).
to be continued…
<excelunusual.com> 6


